Your iPhone is designed for smooth and efficient performance, but over time, you might notice it slowing down, freezing, or running out of storage. One common culprit behind these issues is the accumulation of cache files. Regularly clearing cache can significantly improve your iPhone’s speed, efficiency, and overall performance. In this guide, we’ll walk you through exactly how to clear cache on your iPhone and provide valuable tips to speed it up.
1. Understanding Cache on iPhone
Cache files are temporary data stored on your iPhone by apps, browsers, and the iOS system itself. These files are designed to help apps load faster, retain your browsing preferences, and enhance your overall user experience. However, over time, cache accumulates and may lead to slower performance and reduced storage.
There are three main types of cache:
- App Cache: Stored by individual apps, like Instagram or Spotify, to quickly load frequently accessed content.
- Browser Cache: Stored by web browsers to improve page load times.
- System Cache: Stored by iOS itself to optimize system performance.
Signs your cache needs clearing include sluggish performance, apps crashing frequently, and reduced available storage.
2. How Clearing Cache Speeds Up Your iPhone
Clearing cache directly benefits your iPhone in multiple ways:
- Improved Speed: Removing redundant temporary files speeds up app loading times.
- More Storage: Frees up valuable space that cache files unnecessarily occupy.
- Better Battery Life: Less background processing leads to better battery efficiency.
- Enhanced Stability: Reduces the chance of apps freezing or crashing.
How to Clear App Cache on Your iPhone
#1. Manual Method:
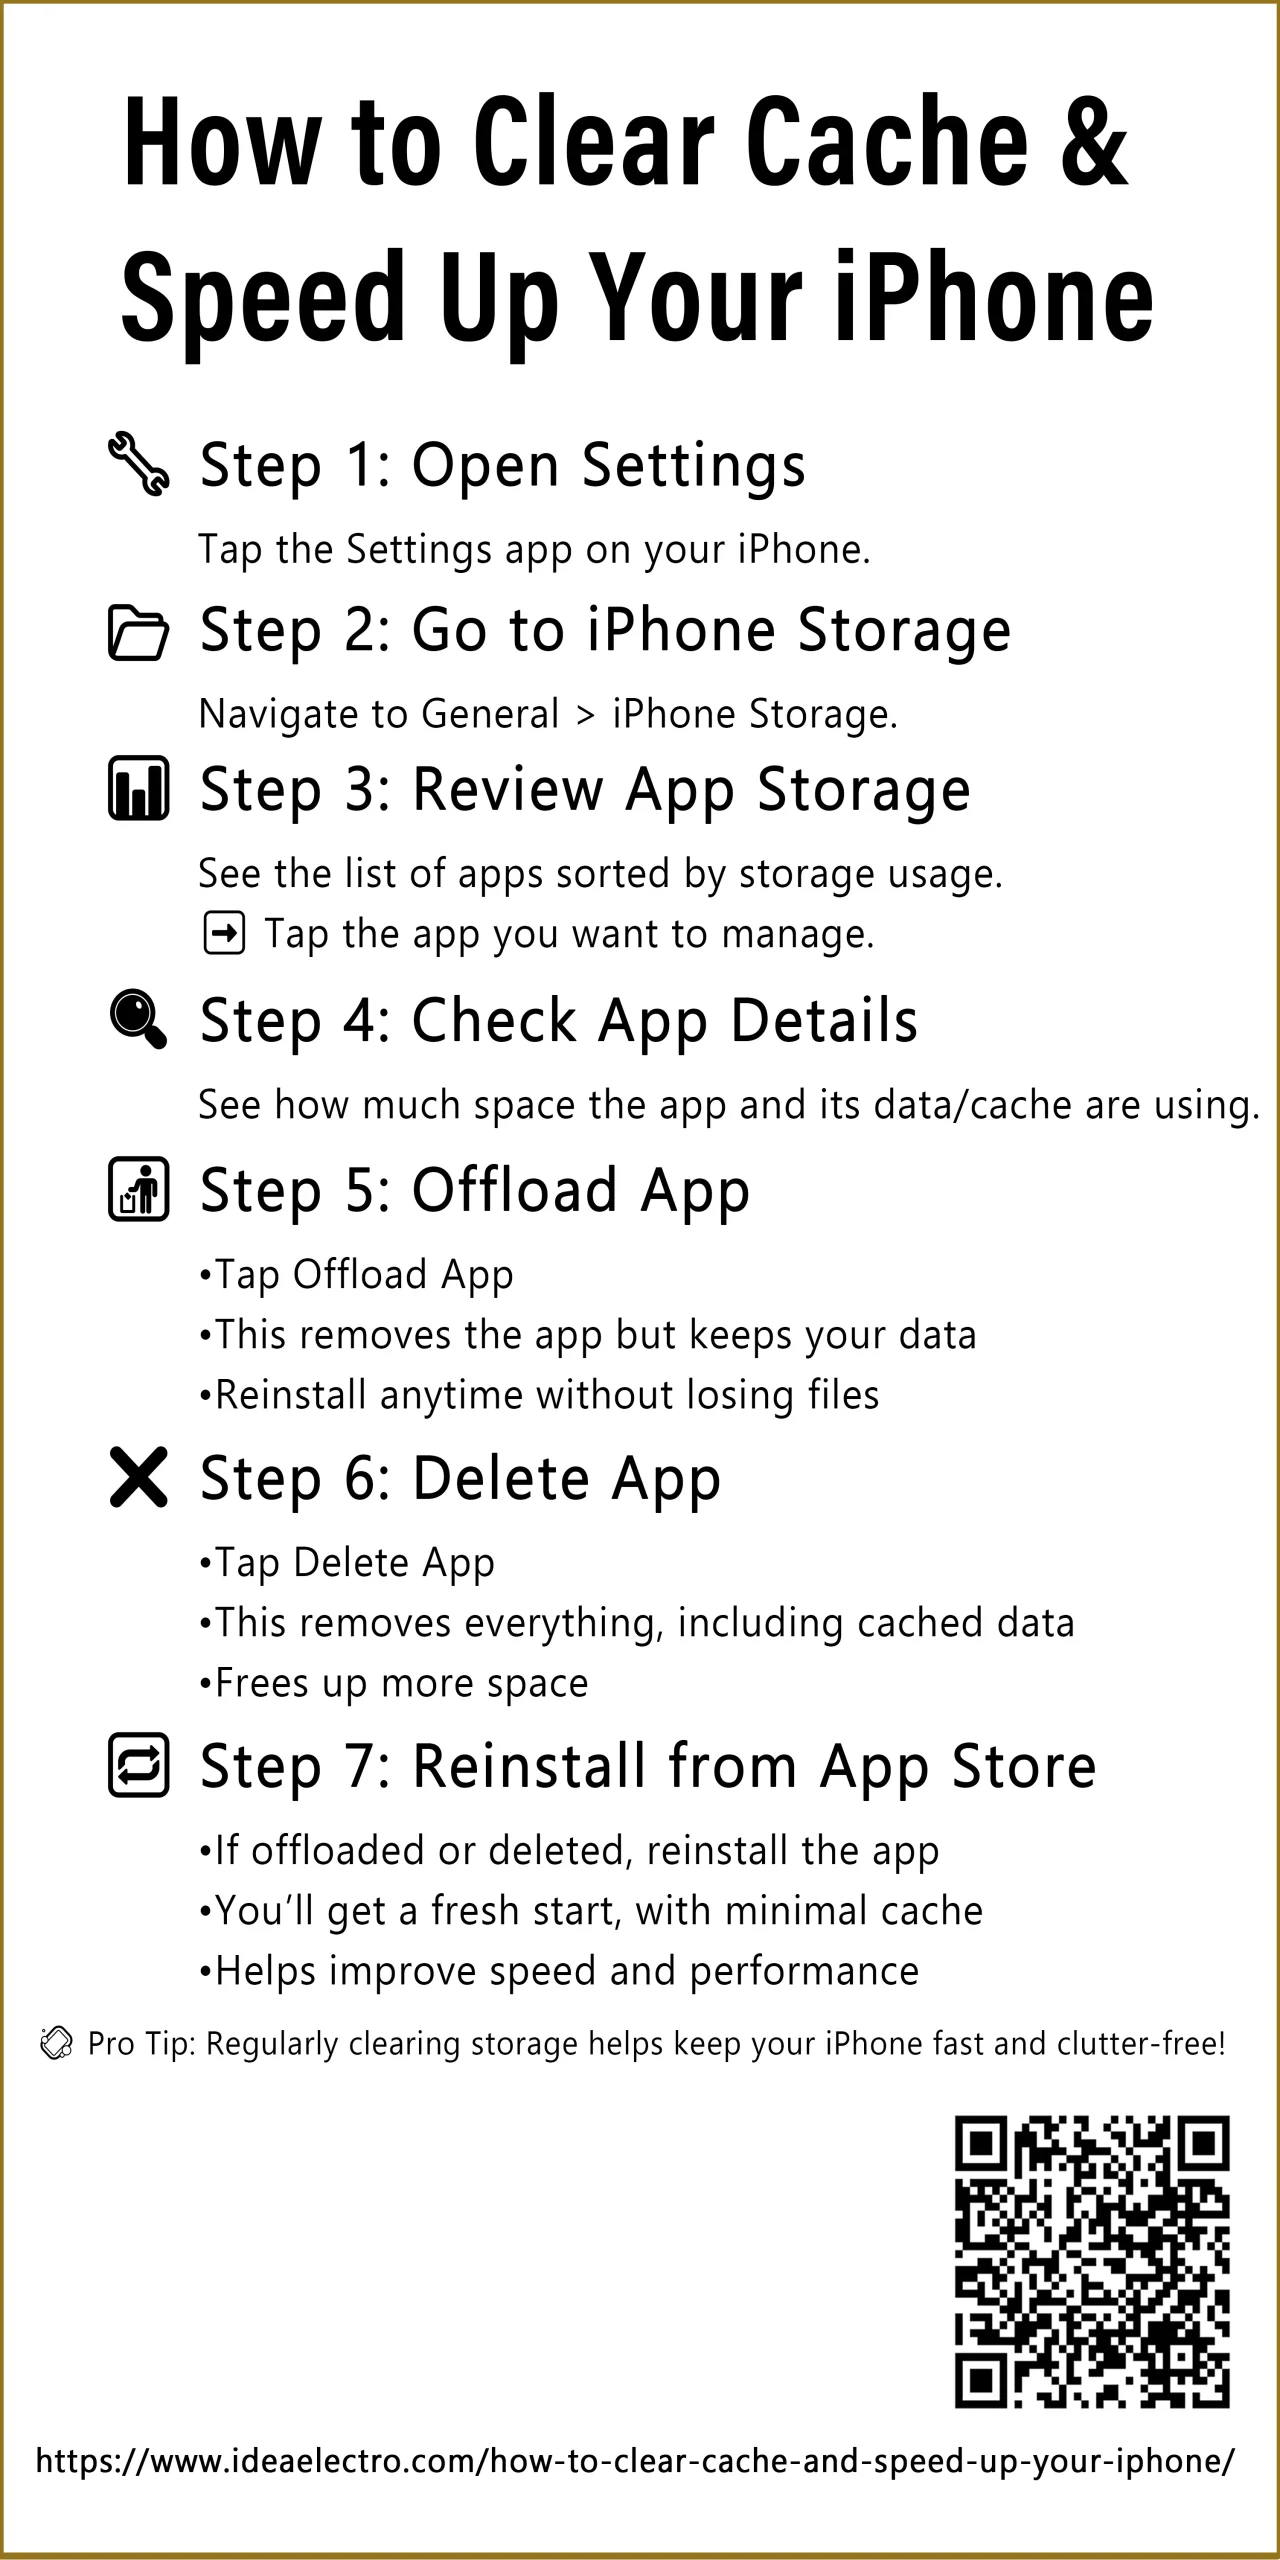
Some apps do not have built-in options for clearing cache. For apps that don’t offer a direct way to clear cache, you can use a manual method to free up space and improve performance. This involves managing app storage through your iPhone’s settings. Below is a comprehensive step-by-step guide to manually clear cache for apps that lack built-in cache-clearing features.
- Access iPhone Storage
- Open the Settingsapp on your iPhone.
- Navigate to General> iPhone Storage.
- Review App Storage Usage
- You’ll see a list of apps sorted by their storage usage. Tap on the app you want to manage.
- Analyze Cache and Data
- On the app’s storage details page, you’ll see how much space the app and its data (including cache) are occupying.
- Offload or Delete the App
- Offload App: Tap Offload Appto remove the app but keep its documents and data. This is useful if you want to reinstall the app later without losing important information.
- Delete App: Tap Delete Appto remove the app and all its associated data, including cache. This is a more thorough option for clearing space.
- Reinstall the App (Optional)
- If you offloaded or deleted the app, you can reinstall it from the App Store. This will start the app fresh with minimal cache, freeing up storage and potentially improving performance.
#2. Clearing Cache Within Apps
Many apps store cached data to improve performance, but over time, this cache can take up significant storage space. Fortunately, some apps offer built-in options to clear their cache directly. By doing so, you can reclaim storage and enhance the app’s performance. Below is a comprehensive step-by-step guide to clearing cache within popular apps like Snapchat, Spotify, Netflix, Instagram and Google Maps.
Step-by-Step Guide to Clearing Cache Within Apps

1. Snapchat
1. Open the Snapchat
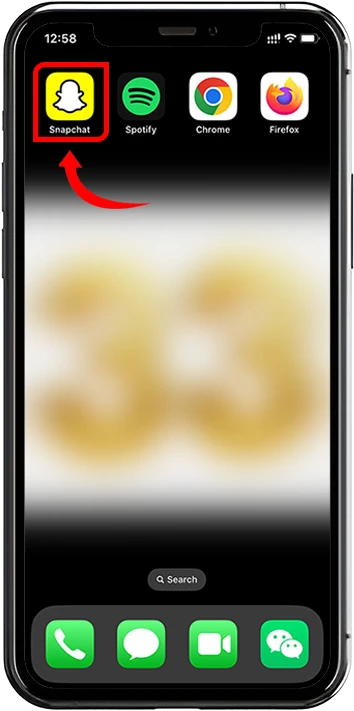
2. Tap your profile iconin the top-left corner.
![]()
3. Select the gear icon(Settings) in the top-right corner.
![]()
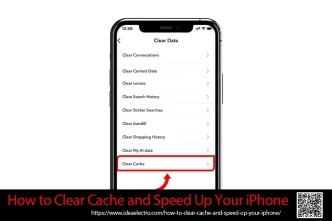
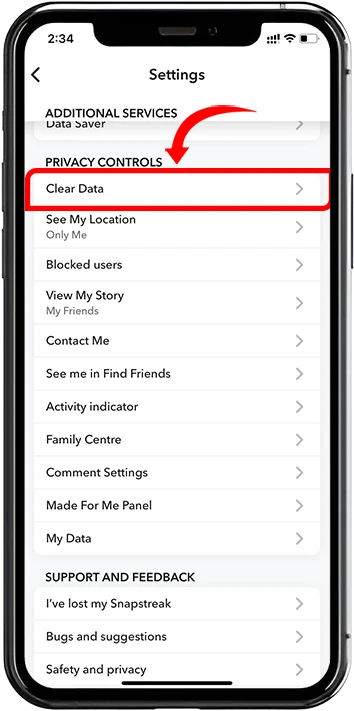
4. Scroll down and tap Clear Data.
5. Tap “Clear Cache.”
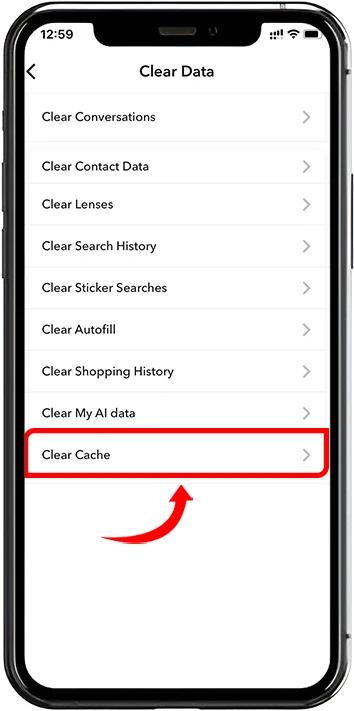
6. Confirm by selecting “Clear”again when prompted.
2. Facebook
1. Open the Facebook
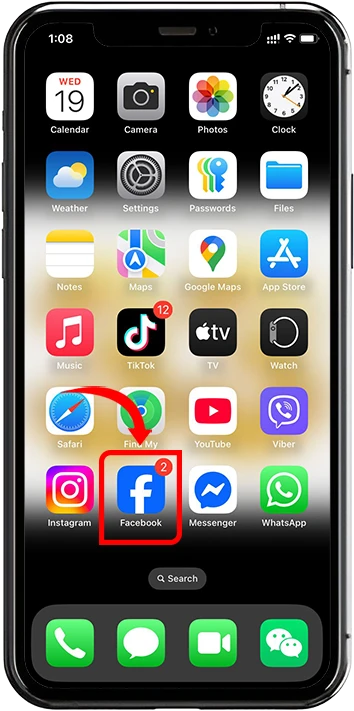
2. Tap on Menu (Profile Pic) down right Corner

3. Tap the gear icon(Settings) in the top-right corner.
![]()
4. Scroll down to the “Browser”and Tap.
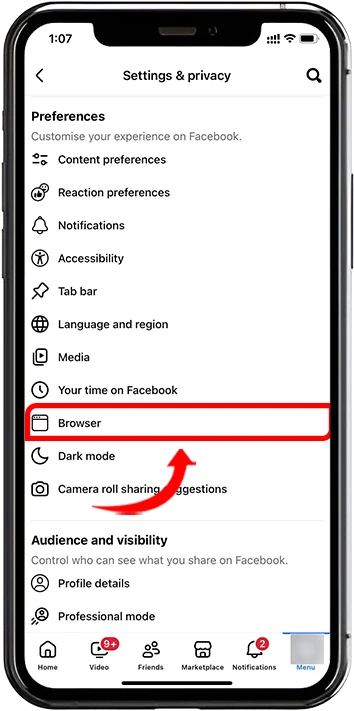
5. Choose the Option from displayed screen and press Clear
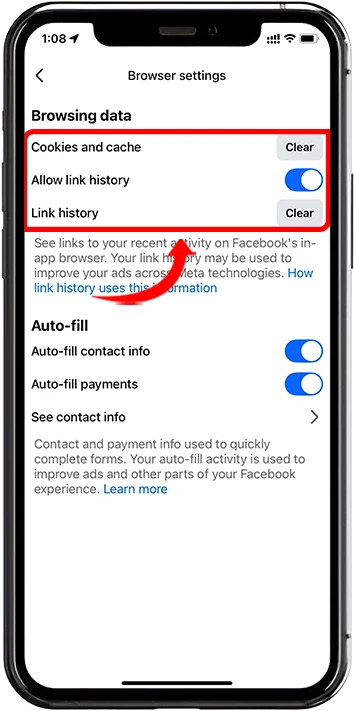
6. Confirm your choice when prompted.
4. Instagram
1. Open the Instagram

2. Go to your profile by tapping the profile icon in the bottom-right corner.
![]()
3. Tap the menu icon(three horizontal lines) in the top-right corner.
![]()
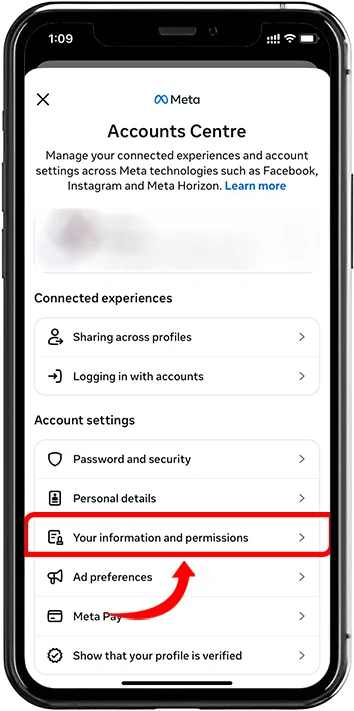
4. Tap on “Accounts Centre.”
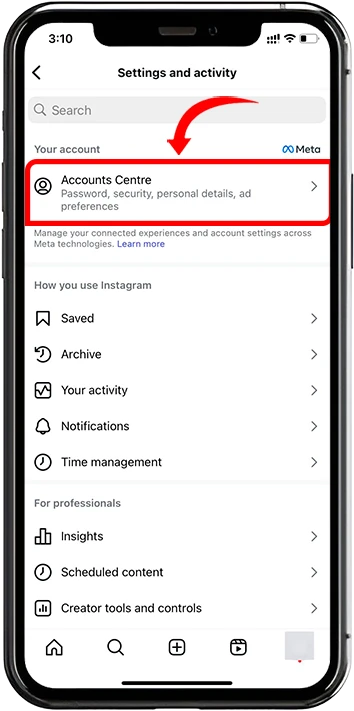
5. Scroll down and tap “Your Information and Permissions”.
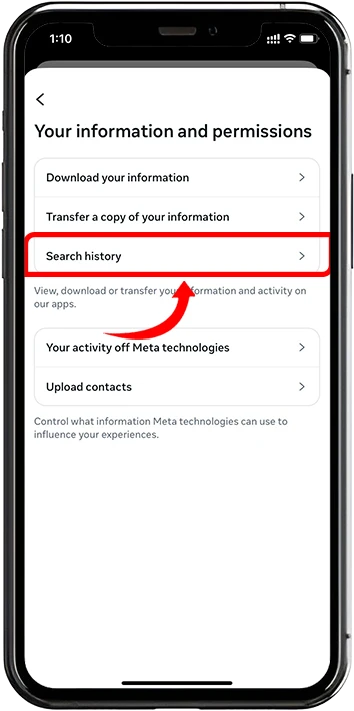
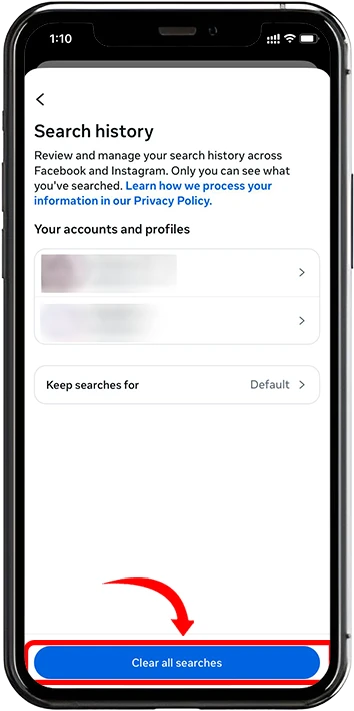
6. Tap on “Search History” and Tap on “Clear all Searches” to remove cached information.
# 3. Clearing Browser Cache (Safari, Chrome, Firefox)
Over time, your browser stores temporary files, cookies, and other data to speed up your browsing experience. However, this cached data can accumulate and take up unnecessary storage space, potentially slowing down your device. Clearing your browser cache is a simple yet effective way to free up storage and ensure smoother performance. Below is a comprehensive step-by-step guide to clearing cache on Safari, Google Chrome, and Firefox.
Step-by-Step Guide to Clearing Browser Cache

1. Clearing Cache on Safari
1. Open the Settings app on your device.
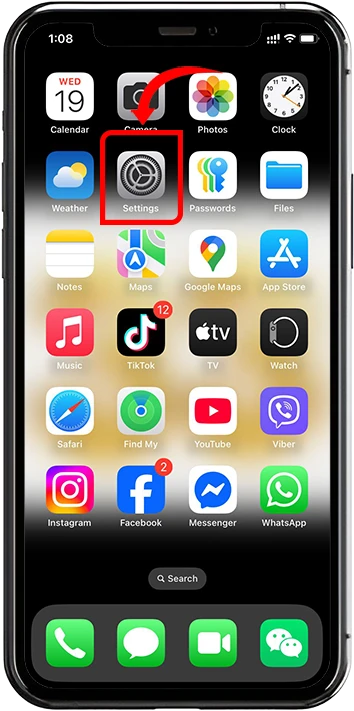
2. Scroll Down and Tap on “Apps”
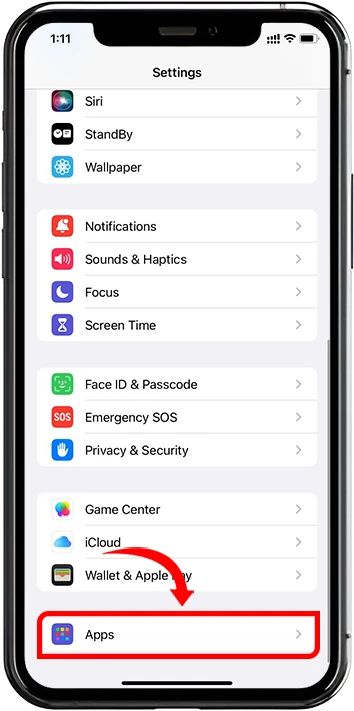
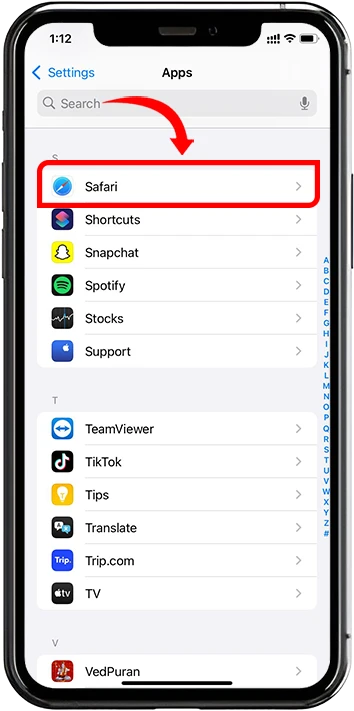
3. Scroll down and select Safari from the list of options.
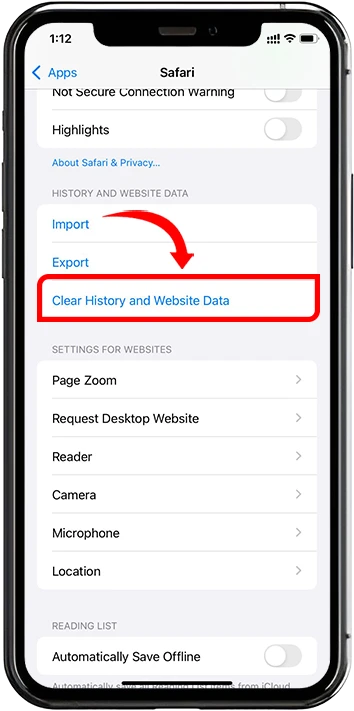
4. Tap Clear History and Website Data at the bottom of the menu.
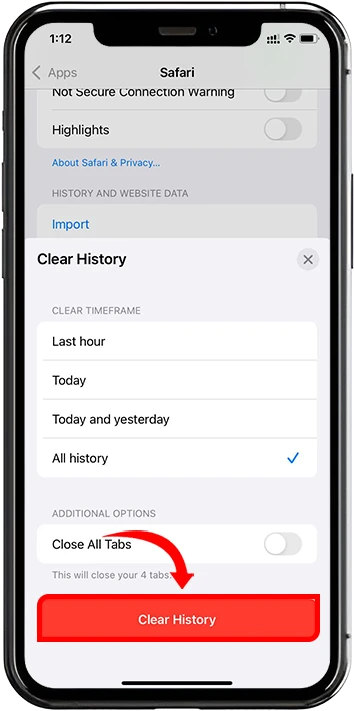
5. Confirm your action when prompted to delete the cache and browsing history.
2. Clearing Cache on Google Chrome
1. Launch the Google Chrome app on your device.
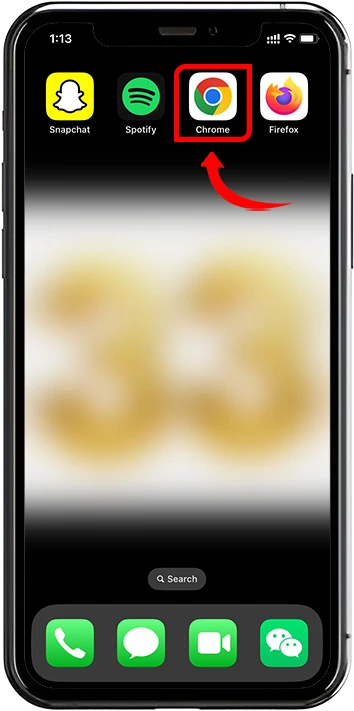
2. Tap the three-dot menu icon (•••) located in the bottom-right corner of the screen.
![]()
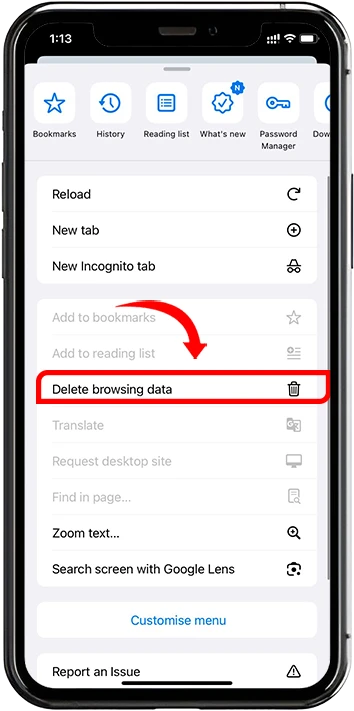
3. Scroll Down and Tap” Delete Browsing Data”.
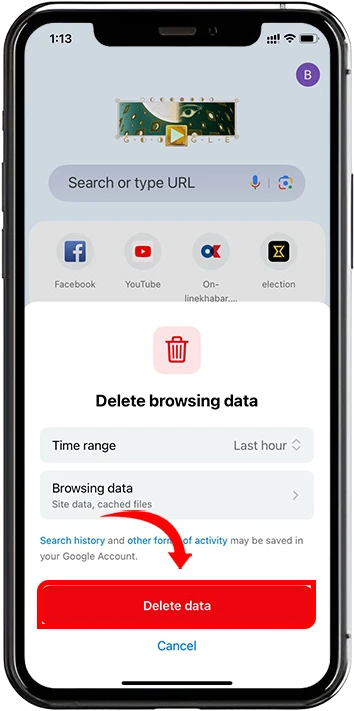
4. Choose the types of data you want to delete (Browsing History, Tabs, Cookies, Site Data, Cached Image and Files, Save Passwords, Auto fill Data) and select the time range. Finally, tap Delete Data to complete the process.
3. Clearing Cache on Firefox
1. Open the Firefox app on your device.

2. Tap the menu icon (three horizontal line) in the bottom-right corner of the screen.
![]()
3. Go to Settings > Data Management.

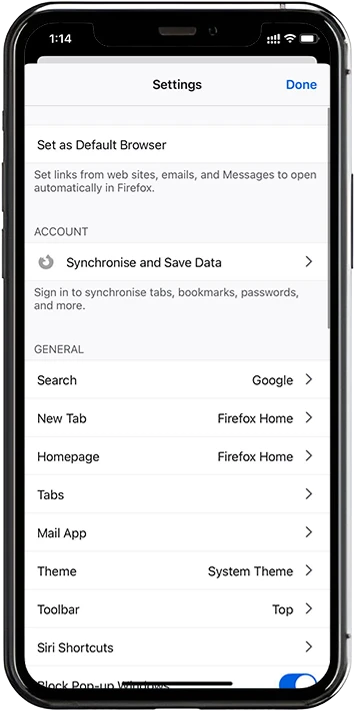

4. Tab on “Web Site Data” after tab on “Clear all Web site Data” to Clear Web Data
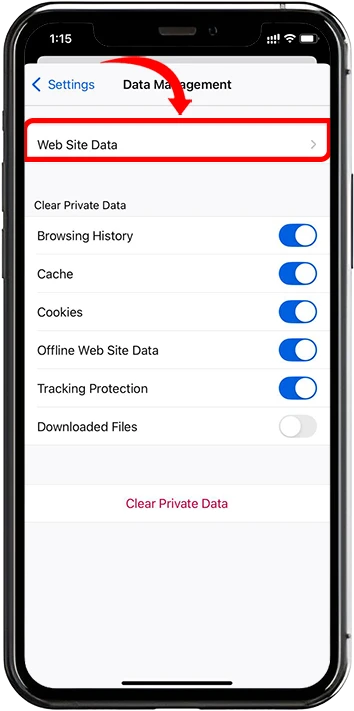
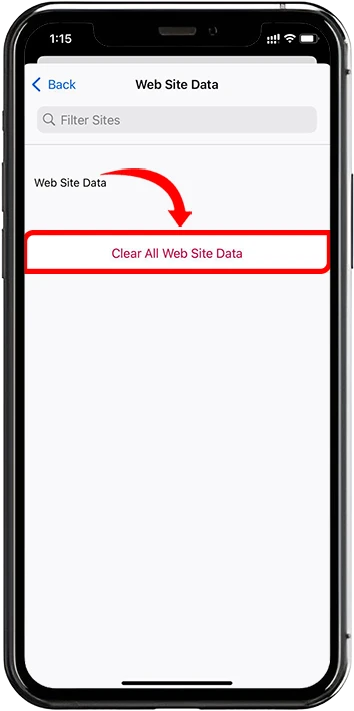
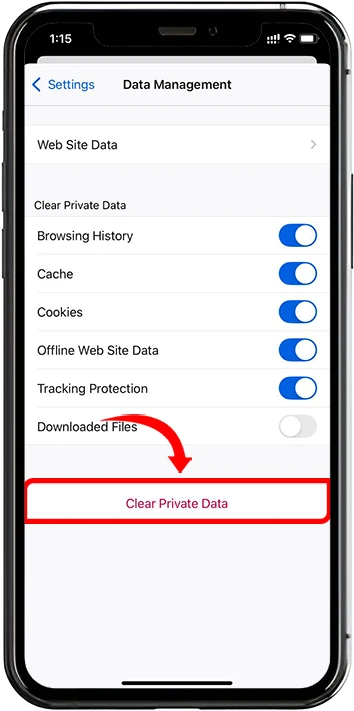
5. Second Option “Clear Private Data” before take this action you can choose the data types you want to remove from given Option and confirm your selection then Tab on Clear Private Data.
#4 Clearing System Cache
System cache on your iPhone consists of temporary files that help apps and processes run smoothly. However, over time, this cache can build up and lead to performance issues or storage constraints. Clearing your system cache can help improve your device’s speed and functionality. Below is a detailed step-by-step guide to clearing system cache on your iPhone, including restarting, force restarting, and resetting network settings.
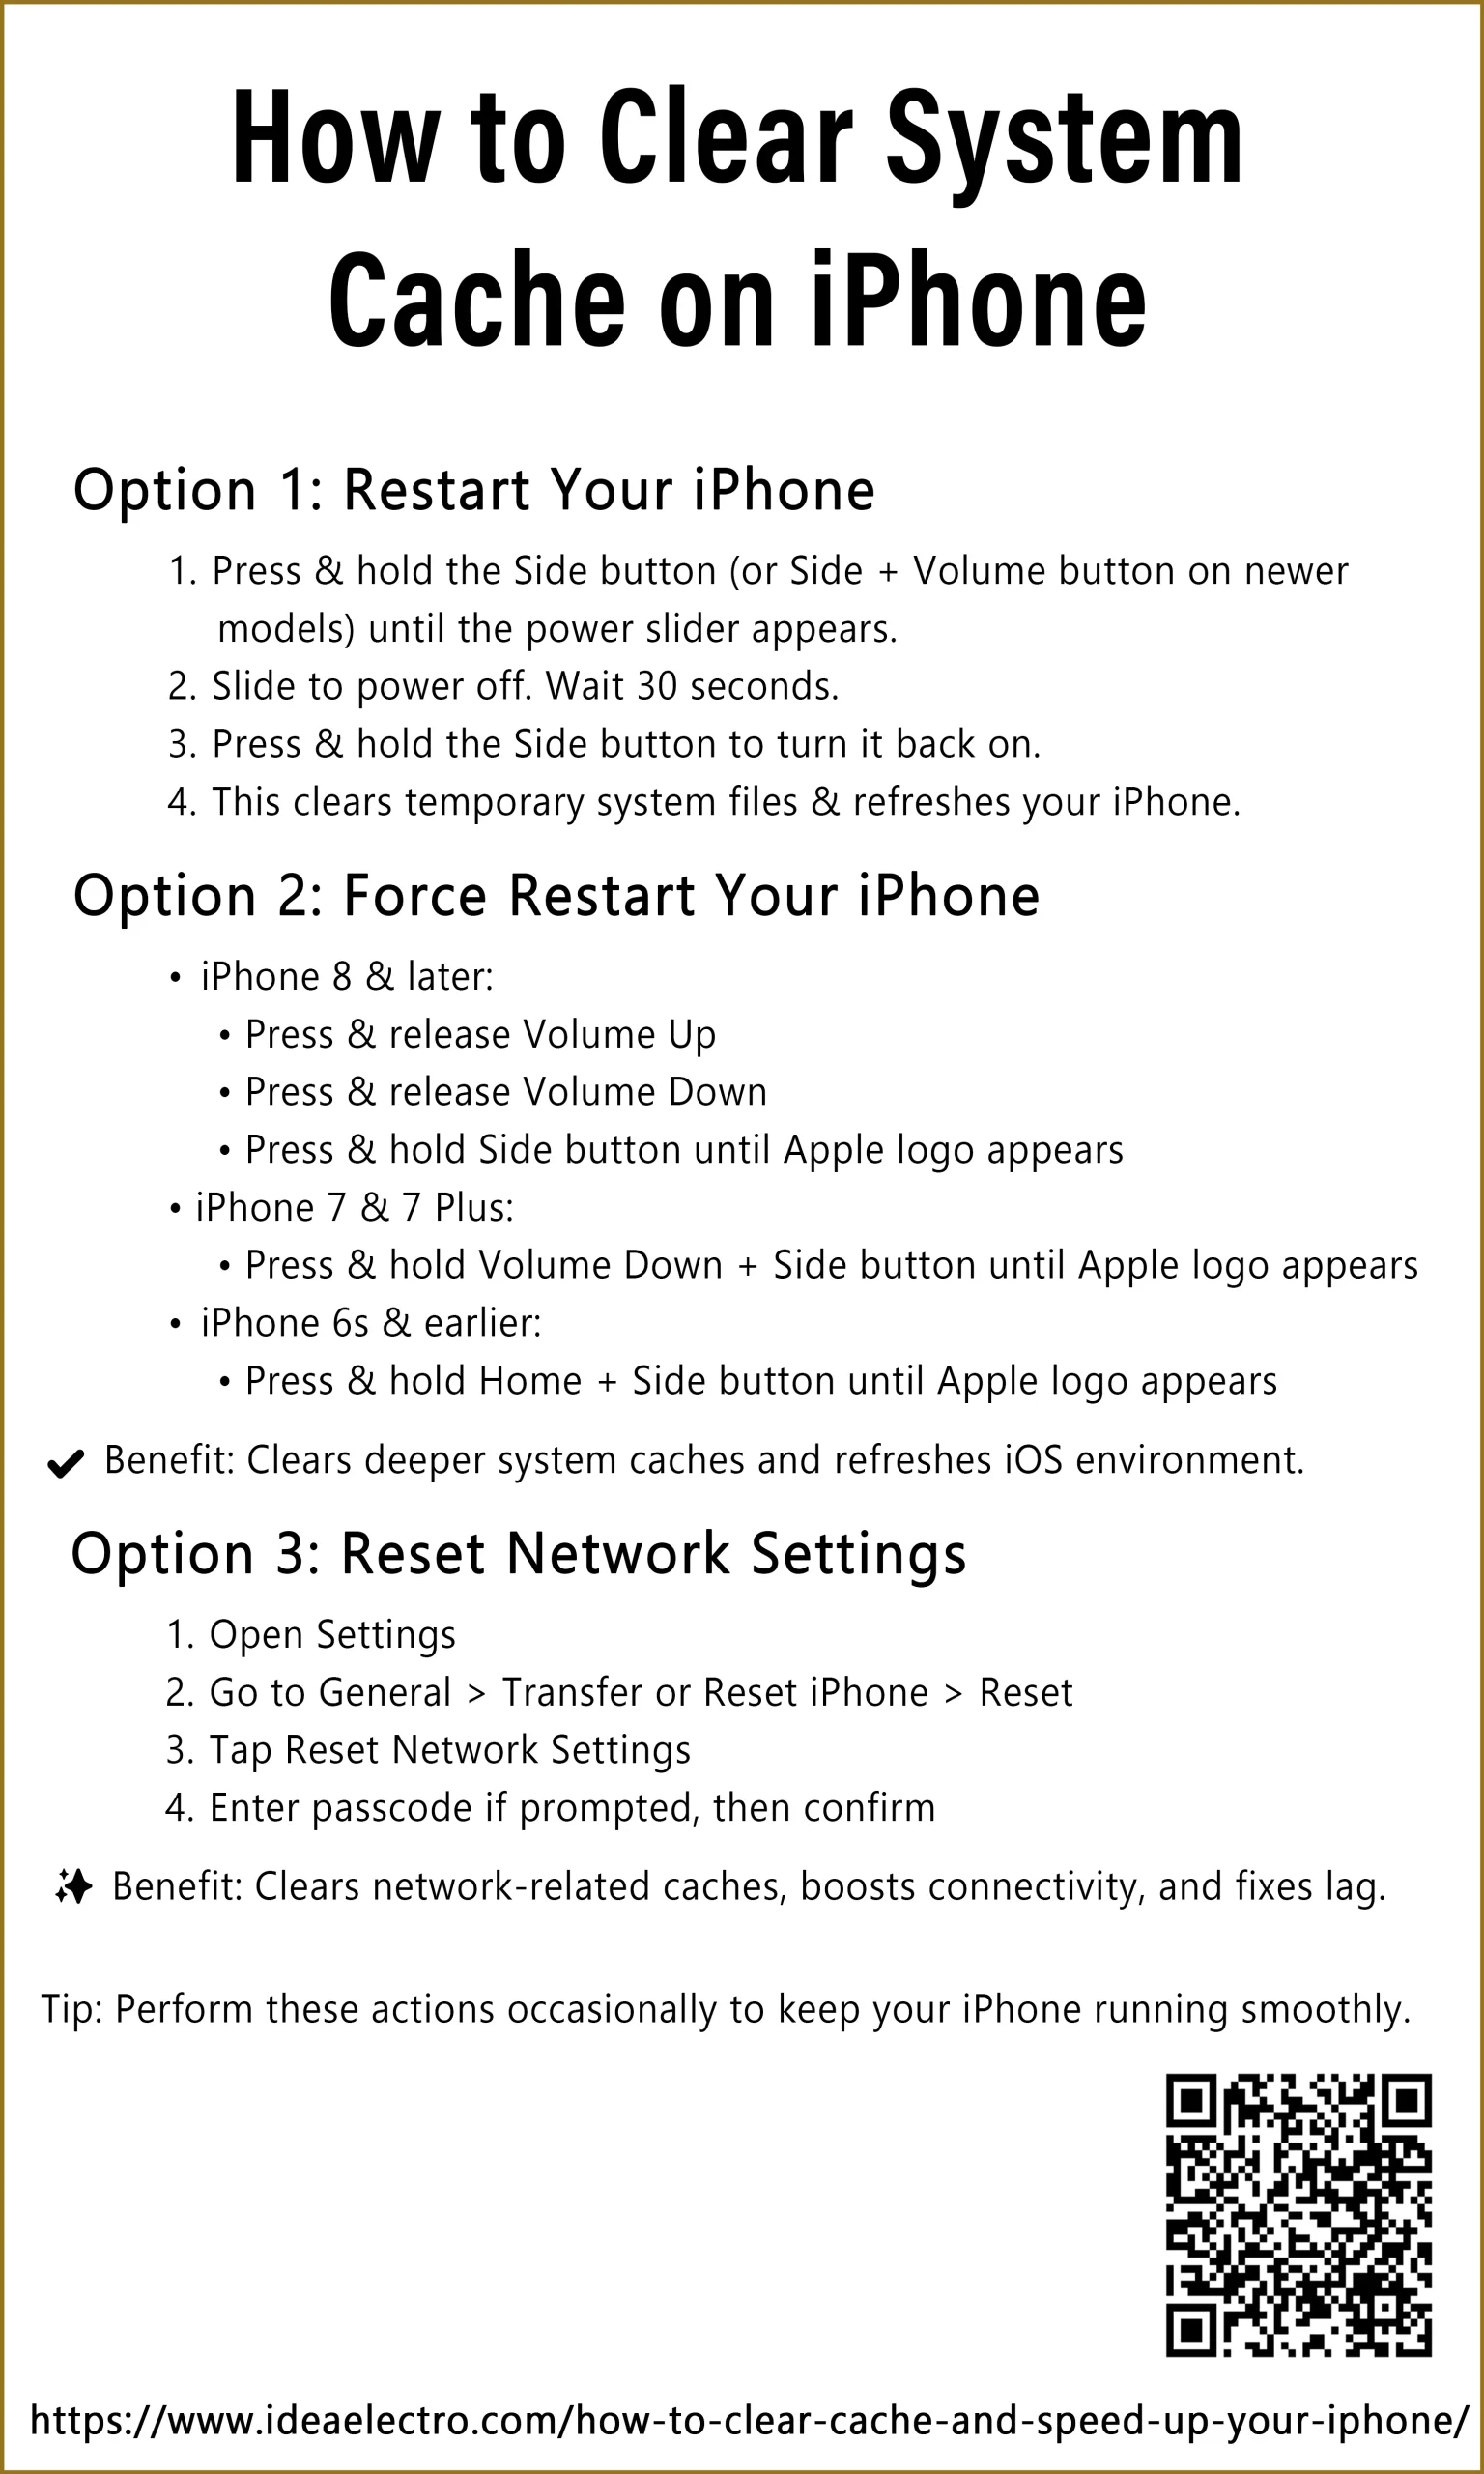
Option 1: Restarting Your iPhone
- Press and hold the side button (or the side button + volume button for newer models) until the power-off slider appears.
- Slide to power off your device and wait for at least 30 seconds.
- Press and hold the side button again to turn your iPhone back on.
- This simple restart clears temporary system files and refreshes your device.
Option 2: Force Restarting Your iPhone (if a regular restart isn’t enough)
- For iPhone 8 and later models: Quickly press and release the volume up button, then quickly press and release the volume down button. Finally, press and hold the side button until the Apple logo appears.
- For iPhone 7 and 7 Plus: Press and hold the volume down button and the side button simultaneously until the Apple logo appears.
- For iPhone 6s and earlier: Press and hold the home button and the side button together until the Apple logo appears.
- A force restart refreshes the iOS environment and clears deeper system caches.
Option 3: Resetting Network Settings
- Open the Settings app on your iPhone.
- Navigate to General > Transfer or Reset iPhone > Reset.
- Tap Reset Network Settings and enter your passcode if prompted.
- Confirm your choice to reset network settings. This action clears network-related caches, improves connectivity, and resolves potential system slowdowns.
#5. Using Third-Party Apps for Cache Cleanup
While basic methods like clearing browser and system cache can significantly improve your device’s performance, sometimes more advanced techniques are required for through cache management. These methods include using third-party apps designed for cache cleanup or performing a factory reset as a last resort. Here are five reputable third-party apps for cache management and device optimization, along with descriptions of their features:
Option 1: Cleaner for iPhone – Phone Booster
- Description: This app helps free up storage space by clearing cache, temporary files, and junk data. It also includes features like photo compression, duplicate file removal, and battery optimization.
- Key Features:
- Clears app cache and junk files.
- Compresses photos to save space.
- Identifies and removes duplicate files.
- Boosts device performance with one-tap optimization.
Option 2: Phone Cleaner: Clean Storage
- Description: A user-friendly app designed to clean up unnecessary files, including app cache, temporary data, and system junk. It also provides detailed storage analysis to help you manage your device’s memory effectively.
- Key Features:
- Clears app cache and temporary files.
- Analyzes storage usage with a visual breakdown.
- Offers a “Smart Clean” feature for quick optimization.
- Helps manage large files and unused apps.
Option 3: Cleaner & Booster for iPhone
- Description: This app focuses on improving device performance by clearing cache, junk files, and optimizing memory. It also includes a privacy feature to securely delete sensitive data.
- Key Features:
- Clears app cache and junk files.
- Optimizes device memory for better performance.
- Securely deletes browsing history and private data.
- Provides real-time device monitoring.
Option 4: iMyFone Umate Pro (Computer Software)
- Description: While not an app, iMyFone Umate Pro is a powerful desktop tool for managing iPhone storage. It can clear cache, junk files, and even permanently erase data to free up space and improve performance.
- Key Features:
- Clears app cache and temporary files.
- Compresses photos and videos to save space.
- Permanently deletes sensitive data for privacy.
- Provides a detailed storage analysis report.
Option 5: Battery Doctor – Battery Life Optimizer
- Description: Primarily known for battery optimization, this app also includes cache-cleaning features to help improve device performance and free up storage space.
- Key Features:
- Clears app cache and junk files.
- Monitors and optimizes battery usage.
- Offers one-tap device optimization.
- Provides tips to extend battery life.
#6. Performing a Factory Reset (Last Resort)
If your iPhone is still sluggish after trying basic cache-clearing methods, a factory reset might be the solution. This process wipes your device clean, removing all data, settings, and cached files, and restores it to its original state. While effective, a factory reset should only be used as a last resort due to its drastic nature. Below is a comprehensive step-by-step guide to performing a factory reset on your iPhone.
Step-by-Step Guide to Performing a Factory Reset
- Back Up Your Data
- Before starting, ensure all important data is backed up to iCloud or a computer using iTunes or Finder. This includes photos, contacts, messages, and app data.
- To back up to iCloud, go to Settings > [Your Name] > iCloud > iCloud Backup > Back Up Now.
- Initiate the Factory Reset
- Open the Settings app on your iPhone.
- Navigate to General > Transfer or Reset iPhone.
- Tap Erase All Content and Settings.
- Confirm the Reset
- Enter your passcode and Apple ID password to confirm the action.
- If prompted, review the data that will be erased and confirm again.
- Wait for the Process to Complete
- Your iPhone will begin erasing all data, including caches, apps, and settings.
- Once the process is complete, your device will restart and display the initial setup screen, just like a brand-new iPhone.
- Restore Your Data (Optional)
- During the setup process, choose Restore from iCloud Backup or Restore from Mac/PC if you want to recover your data.
- Follow the on-screen instructions to complete the restoration and set up your device.
Note: A factory reset should only be used as a last resort when other cache-clearing methods fail to resolve performance issues. It is a powerful solution but requires careful preparation to avoid data loss.
Additional Tips to Speed Up Your iPhone
Here are some additional strategies you can implement to keep your device running smoothly. From managing background activity to optimizing storage, these tips can help you maintain peak efficiency. Additionally, avoiding common mistakes ensures your efforts yield the best results. Below is a comprehensive guide to speeding up your iPhone and avoiding pitfalls.
- Reduce Background Activity
- Open Settings> General > Background App Refresh.
- Disable this feature for apps you rarely use to prevent them from consuming resources in the background.
- Manage Storage Efficiently
- Regularly delete unnecessary photos, videos, and large files.
- Use iCloudor other cloud storage solutions to offload data and free up space.
- Check storage usage in Settings> General > iPhone Storage to identify and remove unused apps or files.
- Disable Unnecessary Location Services
- Navigate to Settings> Privacy & Security > Location Services.
- Limit location tracking for non-essential apps by setting them to “While Using” or “Never.”
- Limit App Refresh
- Go to Settings> App Store.
- Disable Automatic Downloadsand App Updates if you prefer to manually manage app updates.
Common Mistakes to Avoid
- Over-Clearing Cache
- Excessive clearing can force apps to reload data, causing temporary slowdowns. Clear cache only when necessary.
- Ignoring iOS Updates
- Always update to the latest iOS version. Updates often include performance enhancements, bug fixes, and improved cache management.
- Accumulating Unnecessary Apps
- Regularly review and uninstall apps you no longer use. Unused apps can accumulate cache and take up valuable storage space.
Conclusion
Regularly clearing cache is a crucial maintenance practice for your iPhone. It enhances speed, improves battery life, and ensures smoother operation. By following this guide, you can maintain peak performance, avoid unnecessary storage problems, and extend your iPhone’s lifespan. Stay proactive by regularly checking your storage, clearing caches periodically, and following the additional tips provided for ongoing performance optimization.
