In today’s world, your smartphone is more than just a device for making calls or browsing the web—it can be a lifesaver in emergencies. Whether you’re traveling alone, facing a health crisis, or simply want extra peace of mind, your iPhone comes equipped with a powerful feature called Emergency SOS. This tool lets you quickly call emergency services and alert your emergency contacts with just a few simple actions.
In this article, you’ll learn exactly how to activate and use Emergency SOS on your iPhone, how to customize its settings, and tips to ensure you’re using it effectively and responsibly.
What Emergency SOS Does
Emergency SOS is designed to give you fast access to help when you need it most. When activated, it performs several important tasks all at once:
- Calls emergency services (like 911 in the U.S.)
- Sends a text message to your emergency contacts with your current location
- Shares updates if your location changes
- Temporarily disables Face ID or Touch ID, which prevents someone from unlocking your phone without your passcode
For iPhone 14 and newer, the feature even includes Emergency SOS via satellite, which allows you to contact emergency services when you’re off the grid with no cellular or Wi-Fi coverage.
How to Activate Emergency SOS
1. Using the Side Button (iPhone 8 and Later)
If you have an iPhone 8 or newer, activating Emergency SOS is quick and easy:
- Press and hold the side button and one of the volume buttons (up or down) simultaneously.
- A slider will appear on the screen labeled Emergency SOS.
- Drag the slider to call emergency services.
- If you continue holding the buttons without dragging the slider, your iPhone will automatically call emergency services after a countdown (usually 5 seconds) if you have Auto Call enabled.
This method is particularly useful in situations where you can’t look at your screen or need to act fast.
How to Set Up Emergency SOS Settings
To make sure Emergency SOS works exactly how you want it to, it’s important to customize its settings. Here’s how:
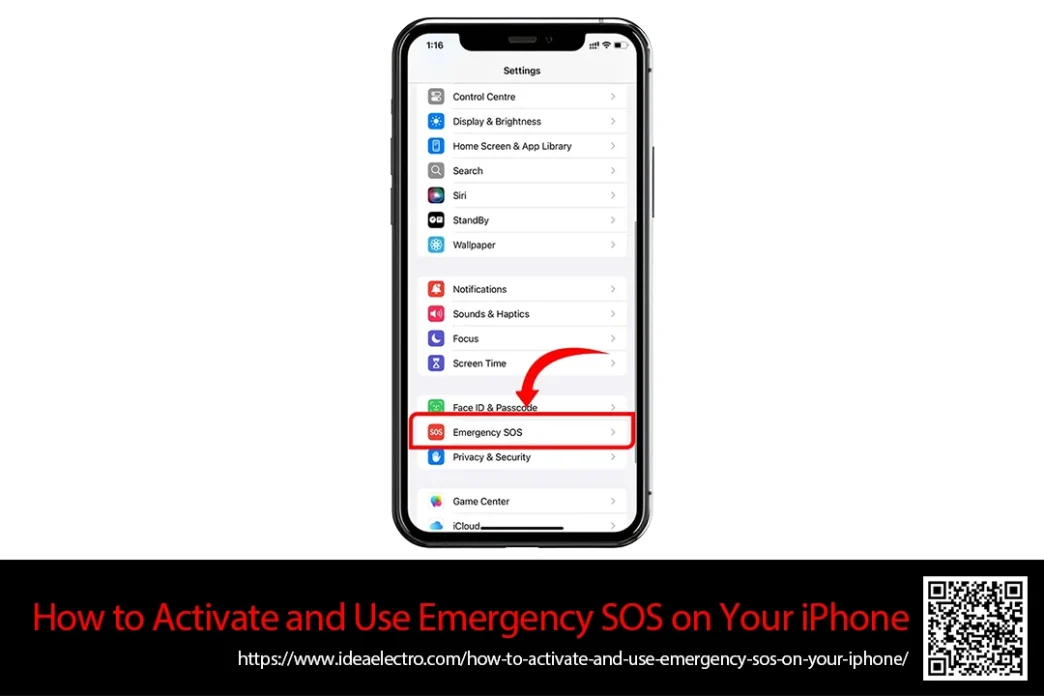
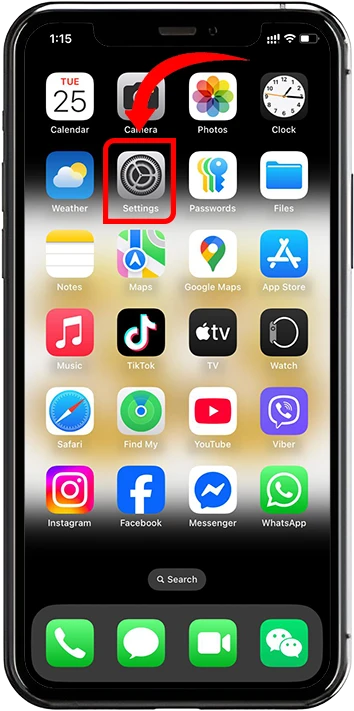
1. Open the Settings app on your iPhone.
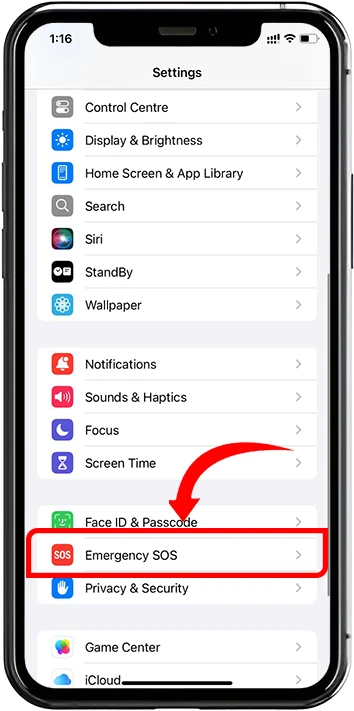
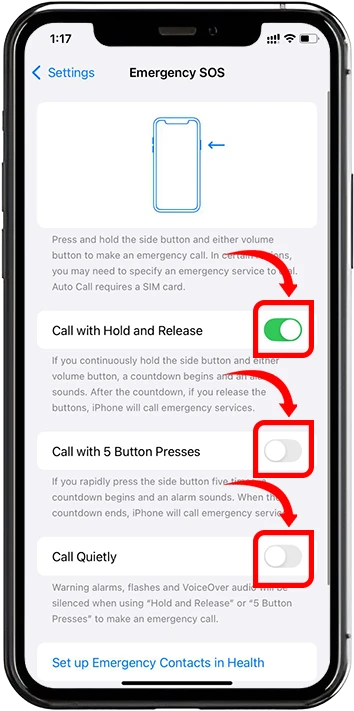
2. Scroll down and tap Emergency SOS. You’ll see several toggle options:
-
- Call with Hold and Release: Enables calling emergency services when you hold the side and volume buttons.
- Call with 5 Button Presses: Lets you activate SOS by pressing the side button five times rapidly.
- Call Quietly: Warning alarms, Flashes and VoiceOver audio will be silenced when using “Hold and Release” or “5 Button Presses” to make an emergency service.
Take a moment to review and enable the options that suit your needs. For many users, enabling both Call with Hold and Call with 5 Presses offers the most flexibility.
How to Add Emergency Contacts in the Health App
Adding emergency contacts is a key part of using Emergency SOS effectively. When you trigger SOS, your iPhone can notify trusted contacts about your emergency and share your location.
Here’s how to set that up:
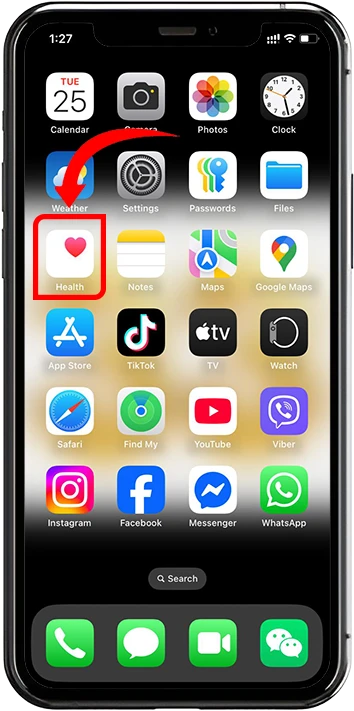
1. Open the Health app on your iPhone.
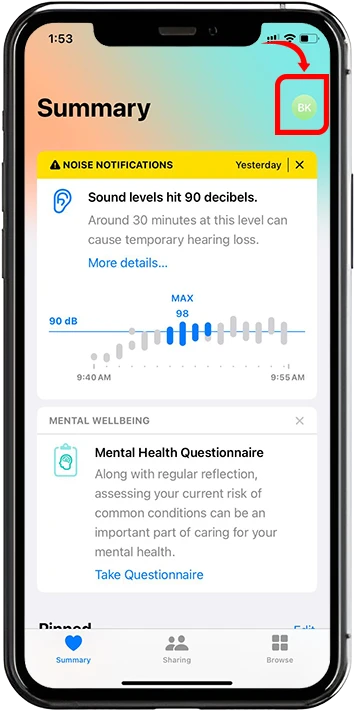
2. Tap your profile picture in the top-right corner.
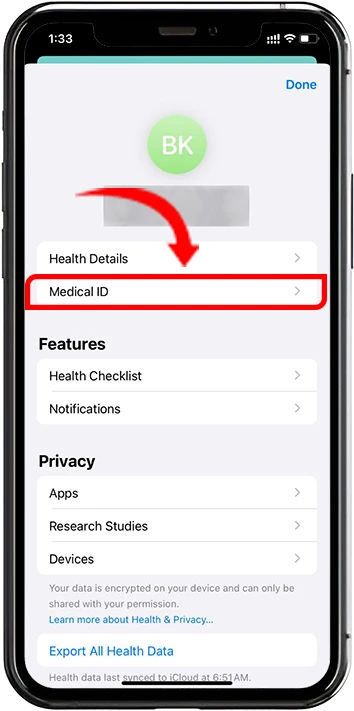
3. Tap Medical ID, then tap Edit in the upper-right.
4. Scroll down to Emergency Contacts.
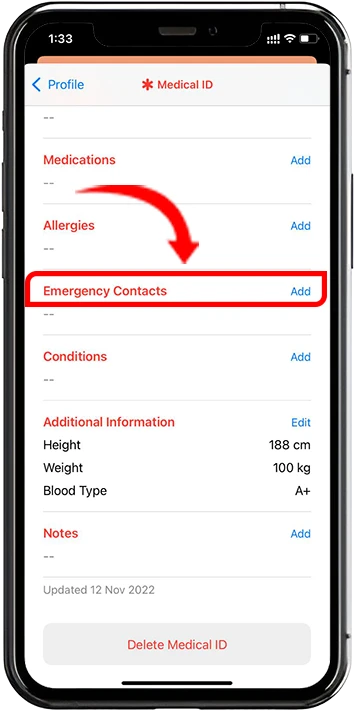
5. Tap the “+” icon to add a new contact and Choose a contact from your list, then specify their relationship to you (e.g., parent, sibling, spouse).
![]()
6. Tap Done to save your changes.

You can add multiple emergency contacts, and they’ll all be notified if you use Emergency SOS. It’s also a good idea to keep your Medical ID up to date with important information like allergies, medical conditions, and blood type. Emergency responders can access this without unlocking your phone.
Tips for Using Emergency SOS Responsibly
While Emergency SOS is a powerful tool, it’s important to use it carefully to avoid unnecessary emergency calls. Here are a few tips:
- Avoid accidental triggers: Be cautious when handling your phone, especially if you carry it in tight pockets or use accessories that press buttons.
- Inform your emergency contacts: Let your chosen contacts know they’re listed so they’re not caught off guard.
- Test the feature: Walk through the activation steps (without completing the call) so you know how it works in real situations.
- Customize your settings: If you find yourself triggering it by mistake, consider turning off one of the activation methods (like 5 presses).
- Respect emergency services: Only use Emergency SOS when it’s truly needed to avoid overwhelming response teams.
Using Emergency SOS via Satellite (iPhone 14 and Newer)
Apple introduced Emergency SOS via satellite with the iPhone 14 lineup—a game-changer for people who enjoy hiking, camping, or traveling in remote areas without signal coverage.
How it Works:
- When you attempt to call emergency services and there’s no cellular or Wi-Fi signal, your iPhone will prompt you to try Emergency SOS via satellite.
- You’ll be asked a series of quick questions to help emergency responders understand your situation.
- Follow the on-screen instructions to point your iPhone at the sky and connect to a satellite.
- Your responses and location will be sent via satellite to Apple-trained emergency dispatchers or local authorities.
Currently, this feature is supported in several countries including the U.S., Canada, U.K., Germany, France, and Australia, with more being added over time. Apple provides two years of free service with the purchase of an iPhone 14 or newer.
Conclusion
Emergency SOS on your iPhone is one of those features you hope you never need—but when you do, it can be a literal lifesaver. By learning how to activate it, setting it up properly, and understanding its full capabilities (including the satellite feature for newer models), you’re taking a smart step toward personal safety and preparedness.
Whether you’re out for a jog, hiking in the woods, or walking home late at night, knowing how to use Emergency SOS means you’re never completely alone. Take a few minutes today to set it up—you’ll thank yourself later.
If you’d like a printable checklist or a video tutorial version of this guide, let me know—I can help with that too!
